 Setup, sessions, overlay controls, hotkeys, and privacy.
Your words, not a machine's
GhostCue doesn't write anything for you. Every answer it shows is one you wrote ahead of time — it simply listens for the right moment and surfaces your own note. There's no chatbot, no large language model, and nothing generated on the fly: it's a fast, private way to find your prepared words — it doesn't generate new ones.
GhostCue does use on-device machine learning for the two jobs that genuinely need it — transcribing speech and matching what's said to the right question in your set — but that work only ever points to a card you authored. What you say is yours.
Requirements
| Requirement | Details |
|---|---|
| Operating system | macOS 26 or later. GhostCue relies on the on-device speech-analysis frameworks introduced in macOS 26 to transcribe both audio streams at once. |
| Processor | Apple Silicon (M1 or later). Intel Macs are not supported. |
| Microphone | Any built-in or external microphone, to hear your voice. |
| Permissions | Microphone, Screen Recording (for system audio), and Speech Recognition — see First launch. |
Everything runs locally, so no internet connection is required to use GhostCue.
How it works
There are three steps:
- Write your notes as Question / Answer pairs.
- Start a session. GhostCue captures your microphone and the audio coming out of your computer, transcribes both speakers on-device, and watches for any of the questions you imported.
- The overlay does the rest. When the other speaker says something close to one of your prepared questions, your answer appears in a small, always-on-top panel. As you start to read, the panel locks on and quietly follows your voice line by line — like a teleprompter that turns its own pages.
You can hide the overlay, browse manually, lock onto a specific note, or step away — all from the keyboard.
First launch
The first time you open GhostCue you'll be walked through a short welcome flow that explains the basics and asks for three macOS permissions:
| Permission | Why it's needed |
|---|---|
| Microphone | To hear your voice and follow along while you speak. |
| Screen Recording | To capture system audio (the sound coming out of your computer — i.e., the other speaker on a call). macOS gates system-audio capture behind this permission. |
| Speech Recognition | To transcribe both audio streams locally. Everything stays on your device. |
If you skip a permission, you can grant it later from System Settings → Privacy & Security. GhostCue checks on every launch and won't try to record anything you haven't approved.
A small starter set of sample questions ships with the app so you can try a session immediately, even before importing your own.
Importing your notes
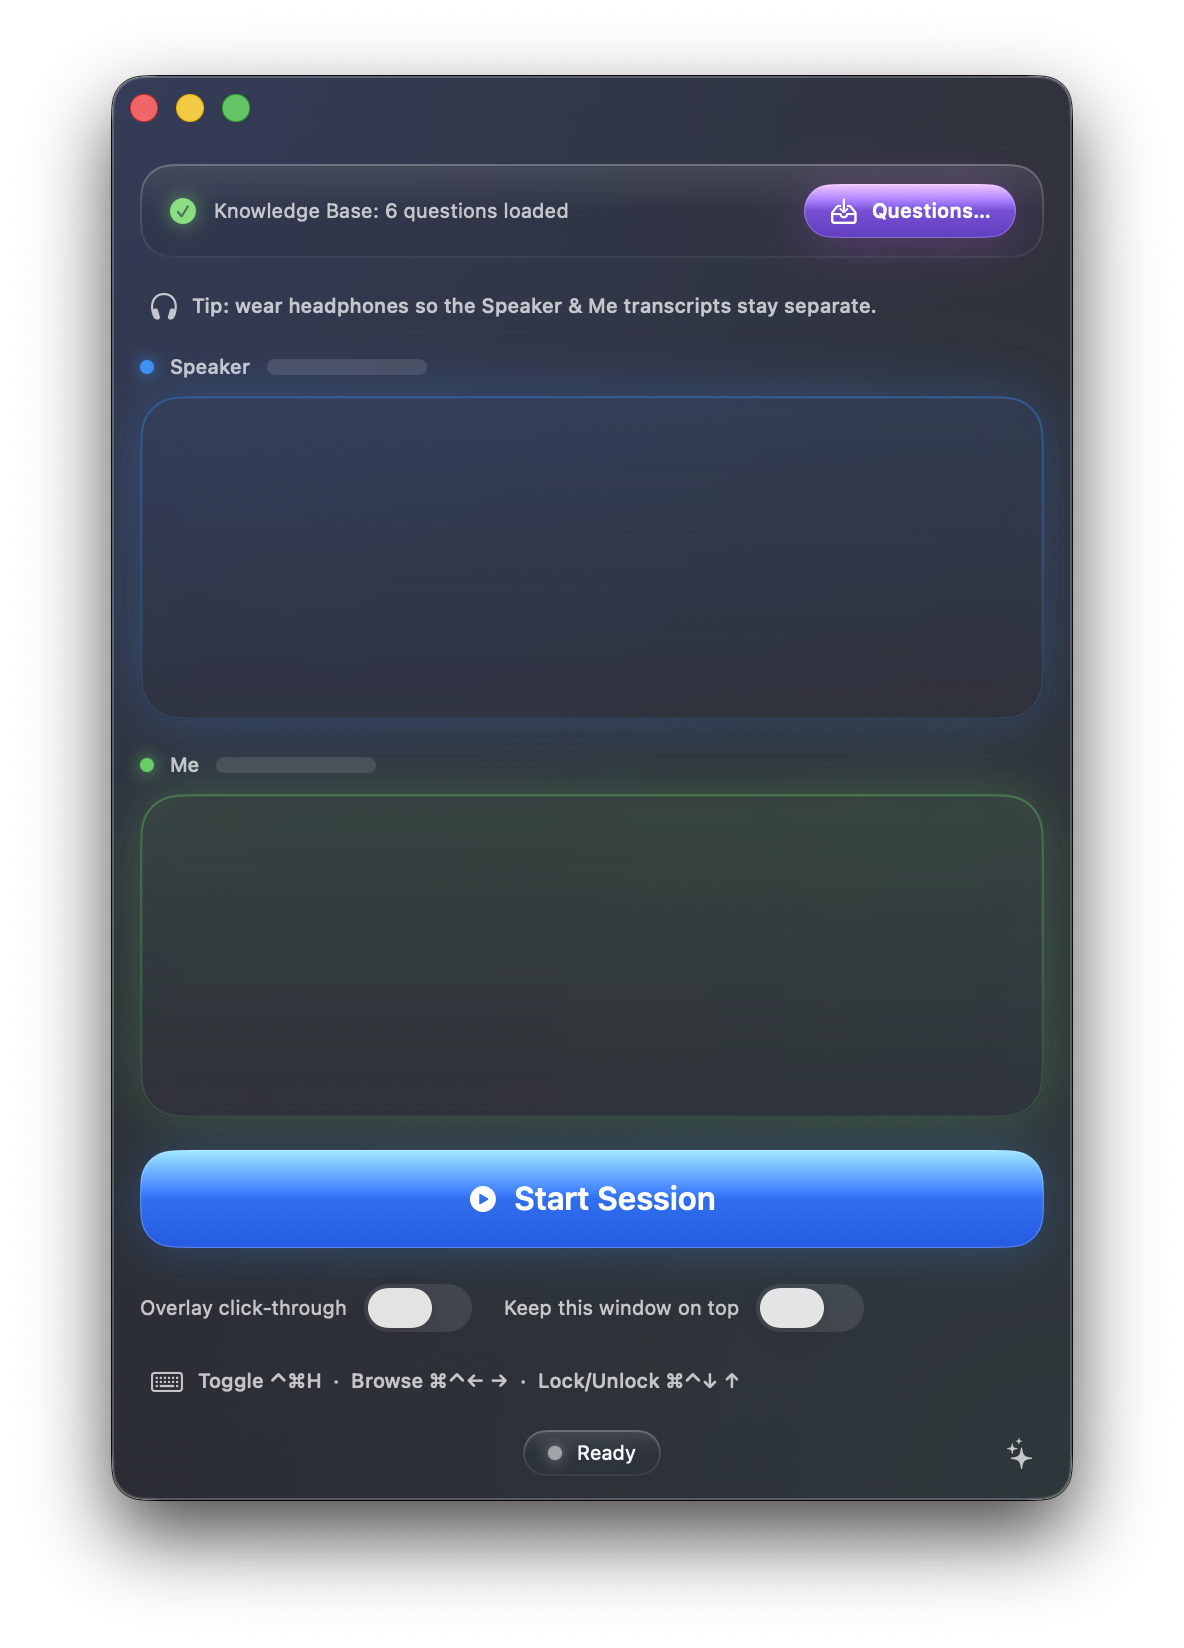
Click Questions… in the top-right of the main window to open the question editor.
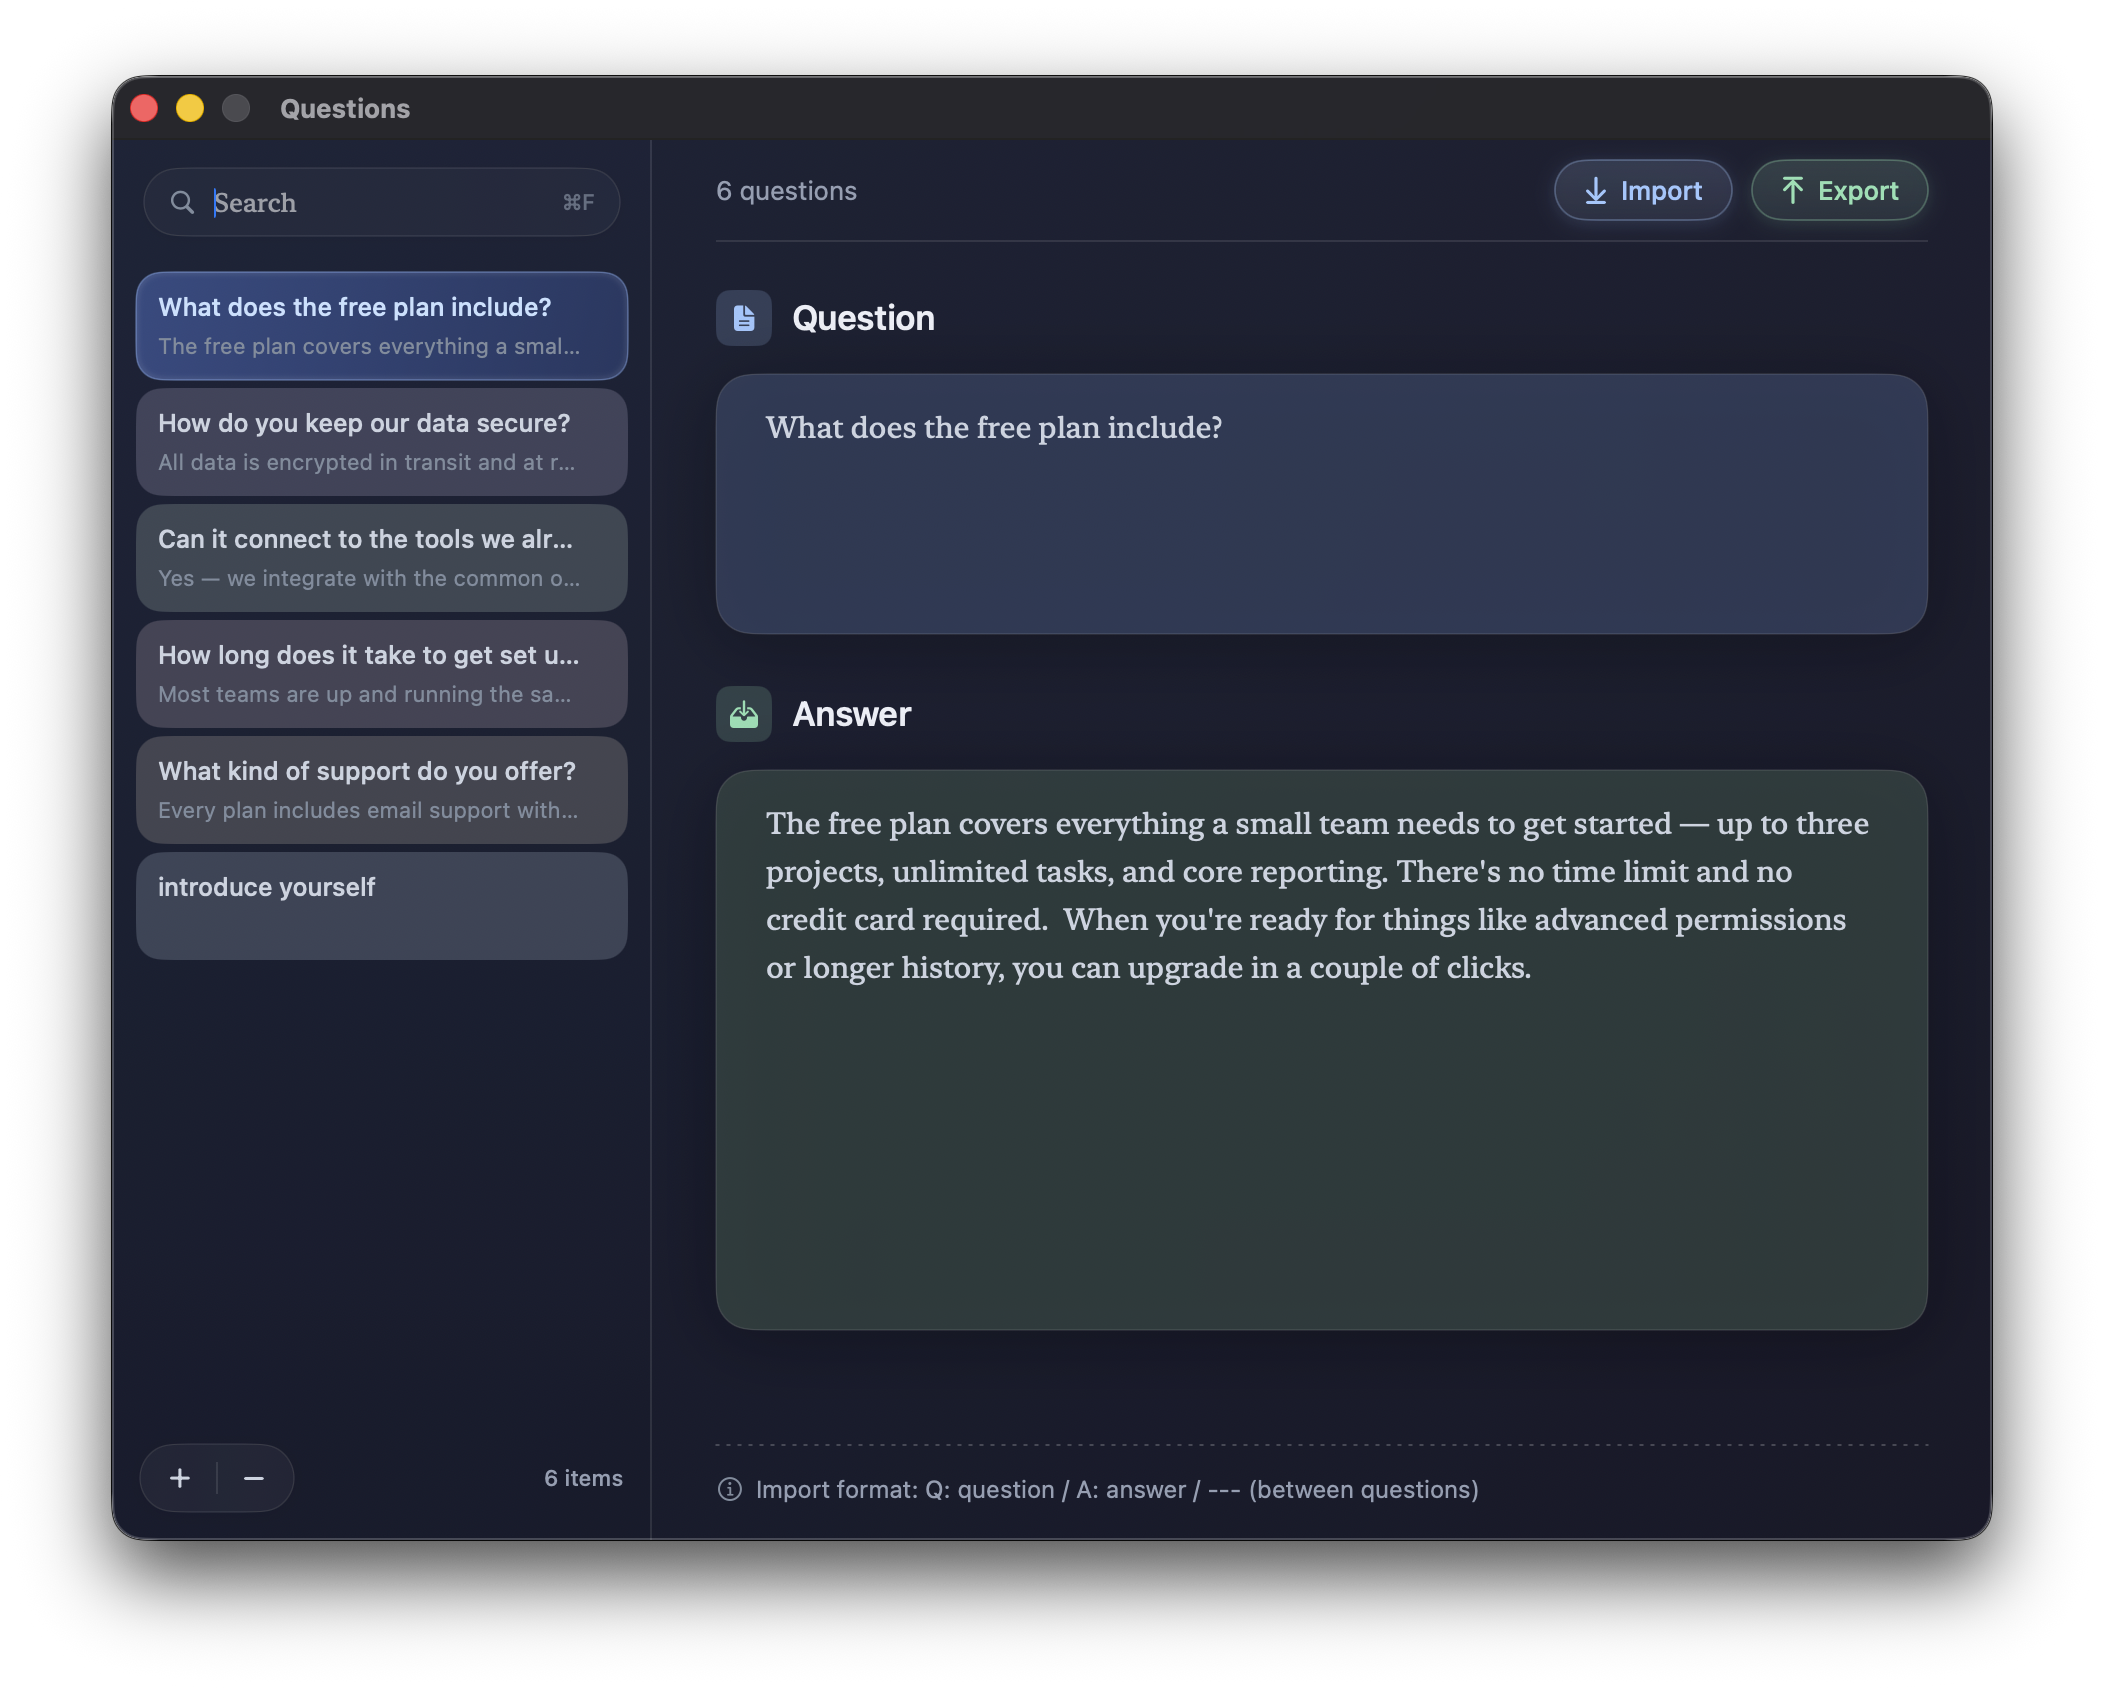
You can either edit questions one at a time in the editor, or paste a whole batch using the Import button. The format is deliberately simple — a tag for the question, a tag for the answer, and a separator between cards:
Q: What's planned for the next release?
A: The next milestone is the analytics dashboard, which we expect
   to ship by the end of the quarter. After that we're focused on
   performance work — cutting cold-start time and trimming memory
   use — before we start on the integrations people have asked for.
---
Q: How does pricing scale as our team grows?
A: Pricing is per active seat, billed monthly, and you can add or
   remove seats at any time. Volume discounts kick in past 25
   seats, and annual billing saves two months versus monthly.
---
Q: …
A: …
Notes:
- The answer can be one paragraph or many lines. Newlines inside an answer are preserved.
- Questions are separated by a line of three or more dashes (
---). - Export writes your current set back out in the same format, so it's easy to keep a copy in your notes app of choice.
Use the search box at the top of the questions list to filter as your set grows. Edits are saved as you type.
Running a session
When you're ready, head back to the main window and click Start Session.
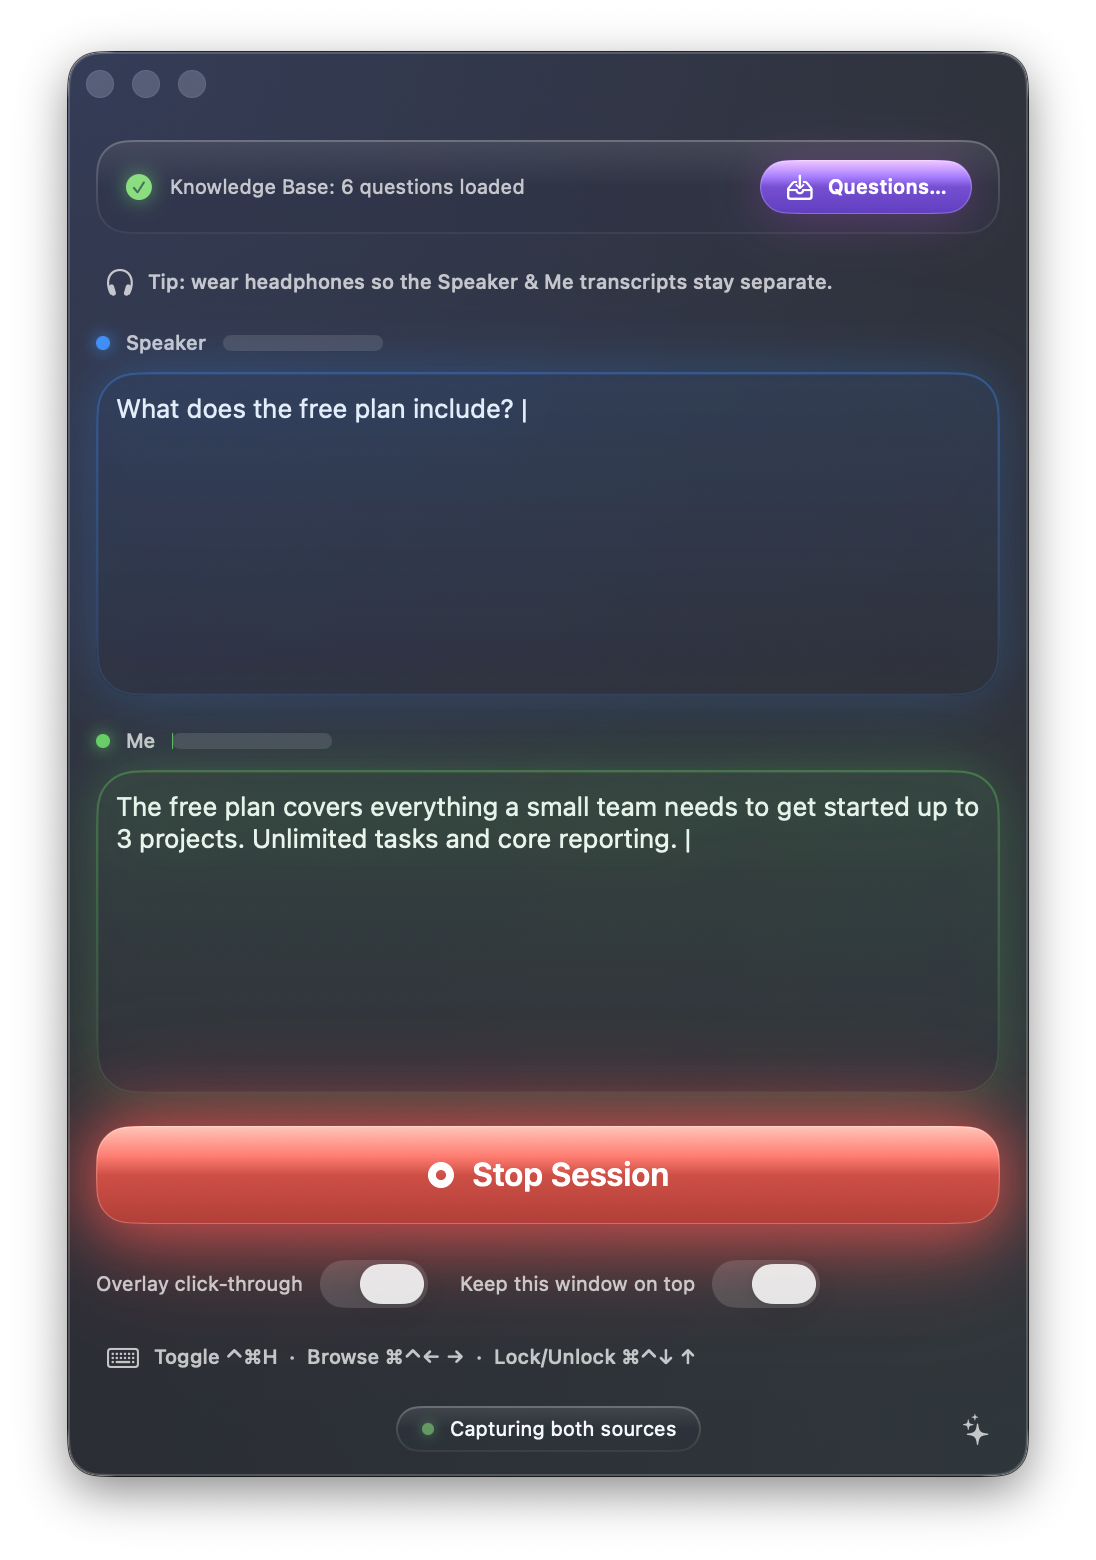
Three things will happen:
- The two transcript boxes (Speaker in blue, Me in green) start filling in real time as audio comes in. The thin colored ring around each box pulses in time with that source's volume, so you can tell at a glance whose mic is hot.
- The Start Session button turns into a glowing red Stop Session button.
- The floating overlay appears (you can also call it back any time with the toggle hotkey — see Hotkeys).
Click Stop Session to end. If "Save session transcripts" is on (off by default), GhostCue writes a plain-text transcript to your sessions folder and shows a green Session saved · Reveal toast. Click Reveal to jump straight to the file in Finder.
Tip: wear headphones during a real session. Without them, the other speaker's voice plays out of your laptop speakers and bleeds into your mic, which causes the Speaker and Me transcripts to overlap.
The overlay
The overlay is a small, always-on-top panel that sits wherever you last placed it. It's deliberately compact — small enough to tuck into a corner of the screen, transparent enough to not be the center of attention.
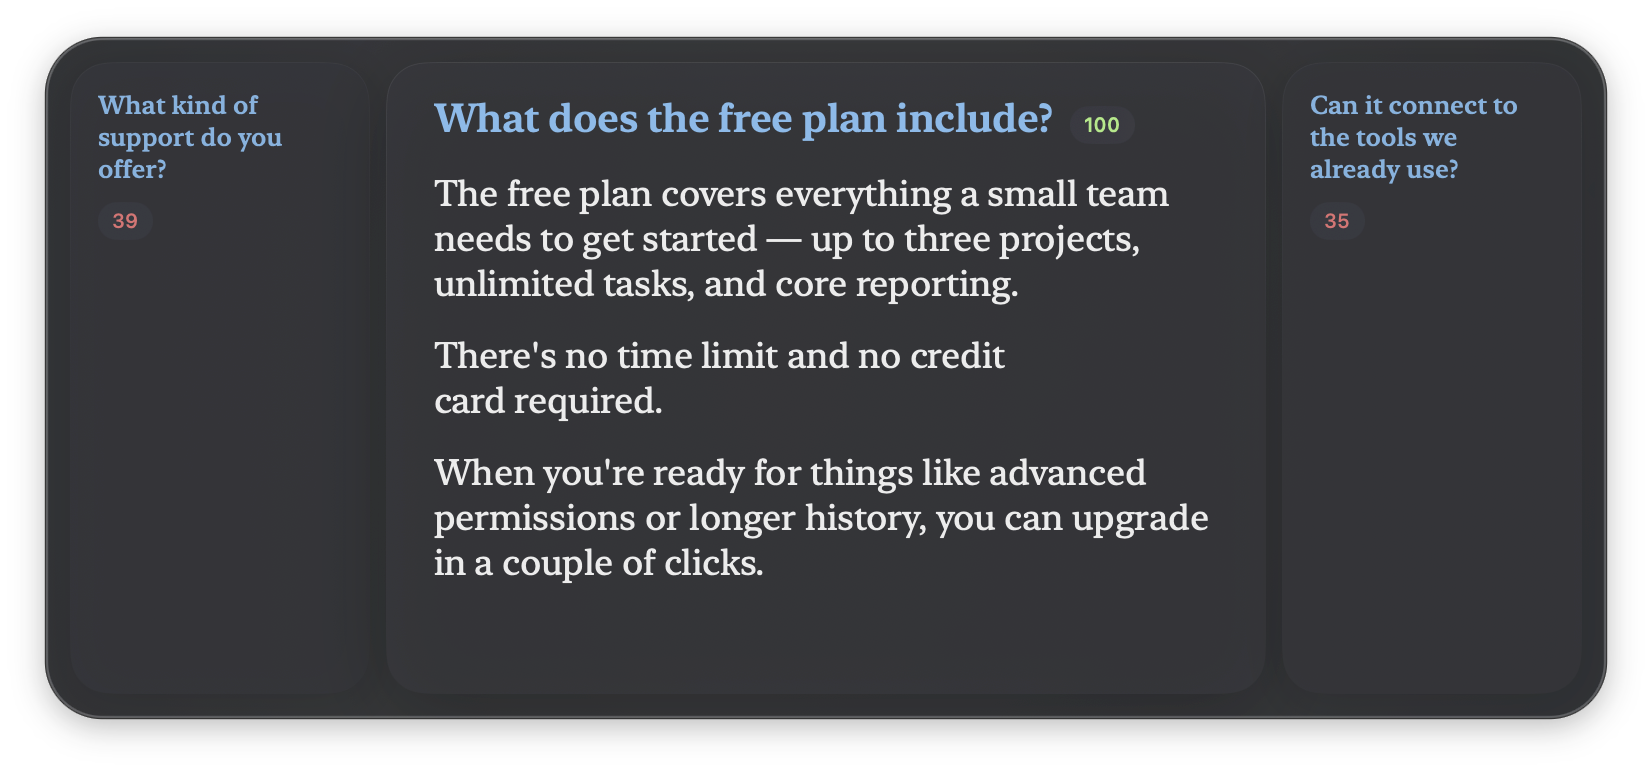
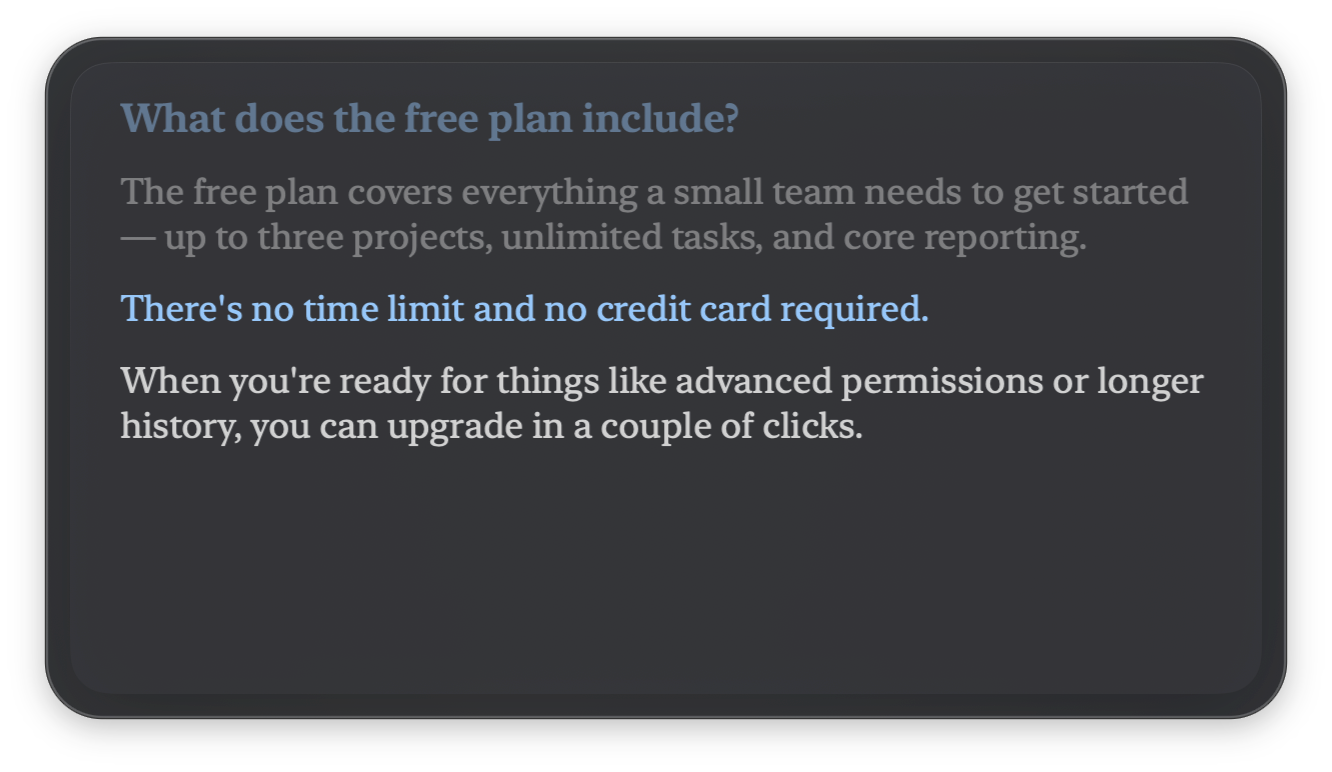
It shows a rolling list of the top matches (3, 5, or 7 — your choice) for what's being said right now. The match GhostCue thinks is most likely is highlighted; the others are dimmed. As soon as you start answering, the overlay locks on to the highlighted one and switches into teleprompter mode, scrolling the answer at your pace.
Things you can do with it:
- Move it. Click-drag the panel to wherever it's least in the way of your camera and your face.
- Make it click-through. Toggle Overlay click-through in the main window to let mouse clicks pass straight through the overlay to whatever's behind it. Useful when the overlay would otherwise sit on top of a button you need to press.
- Hide it without stopping the session. Press the overlay hotkey (
⌃⌘Hby default). Press again to bring it back. - Read alongside it. While locked, the line you're currently speaking is highlighted; lines you've already covered fade out.
- Browse manually. When you're not yet locked on, the arrow hotkeys move between the listed matches.
- Lock onto a specific match. Press the lock hotkey to commit to whichever match is highlighted, even if GhostCue hasn't picked it on its own yet.
- Unlock. When you're done with the current answer, the overlay auto-unlocks after a short pause. You can also unlock manually with the up-arrow hotkey.
If you'd rather not have your notes show up in screen recordings or video calls, turn on Privacy mode in Settings → Appearance. The overlay will be visible to you on screen but invisible to capture software — useful when you're sharing your screen on a call.
Hotkeys
All hotkeys work even when GhostCue isn't the front app, so you can drive it from inside whatever you're presenting in.
| Hotkey | Action |
|---|---|
⌃⌘H | Show / hide the overlay |
⌘⌃ ← / ⌘⌃ → | Matching mode: browse between the listed matches. Locked mode: jump to the previous / next sentence. |
⌘⌃ ↓ | Lock onto the currently highlighted match |
⌘⌃ ↑ | Unlock and go back to live matching |
You can change all of these in Settings → Hotkeys, including swapping the arrow modifier from ⌘⌃ to anything else if it clashes with another app.
The current bindings are always shown at the bottom of the main window, so you don't have to memorise them.
Settings
Open settings with ⌘, from the main window. Five tabs across the top:
Appearance
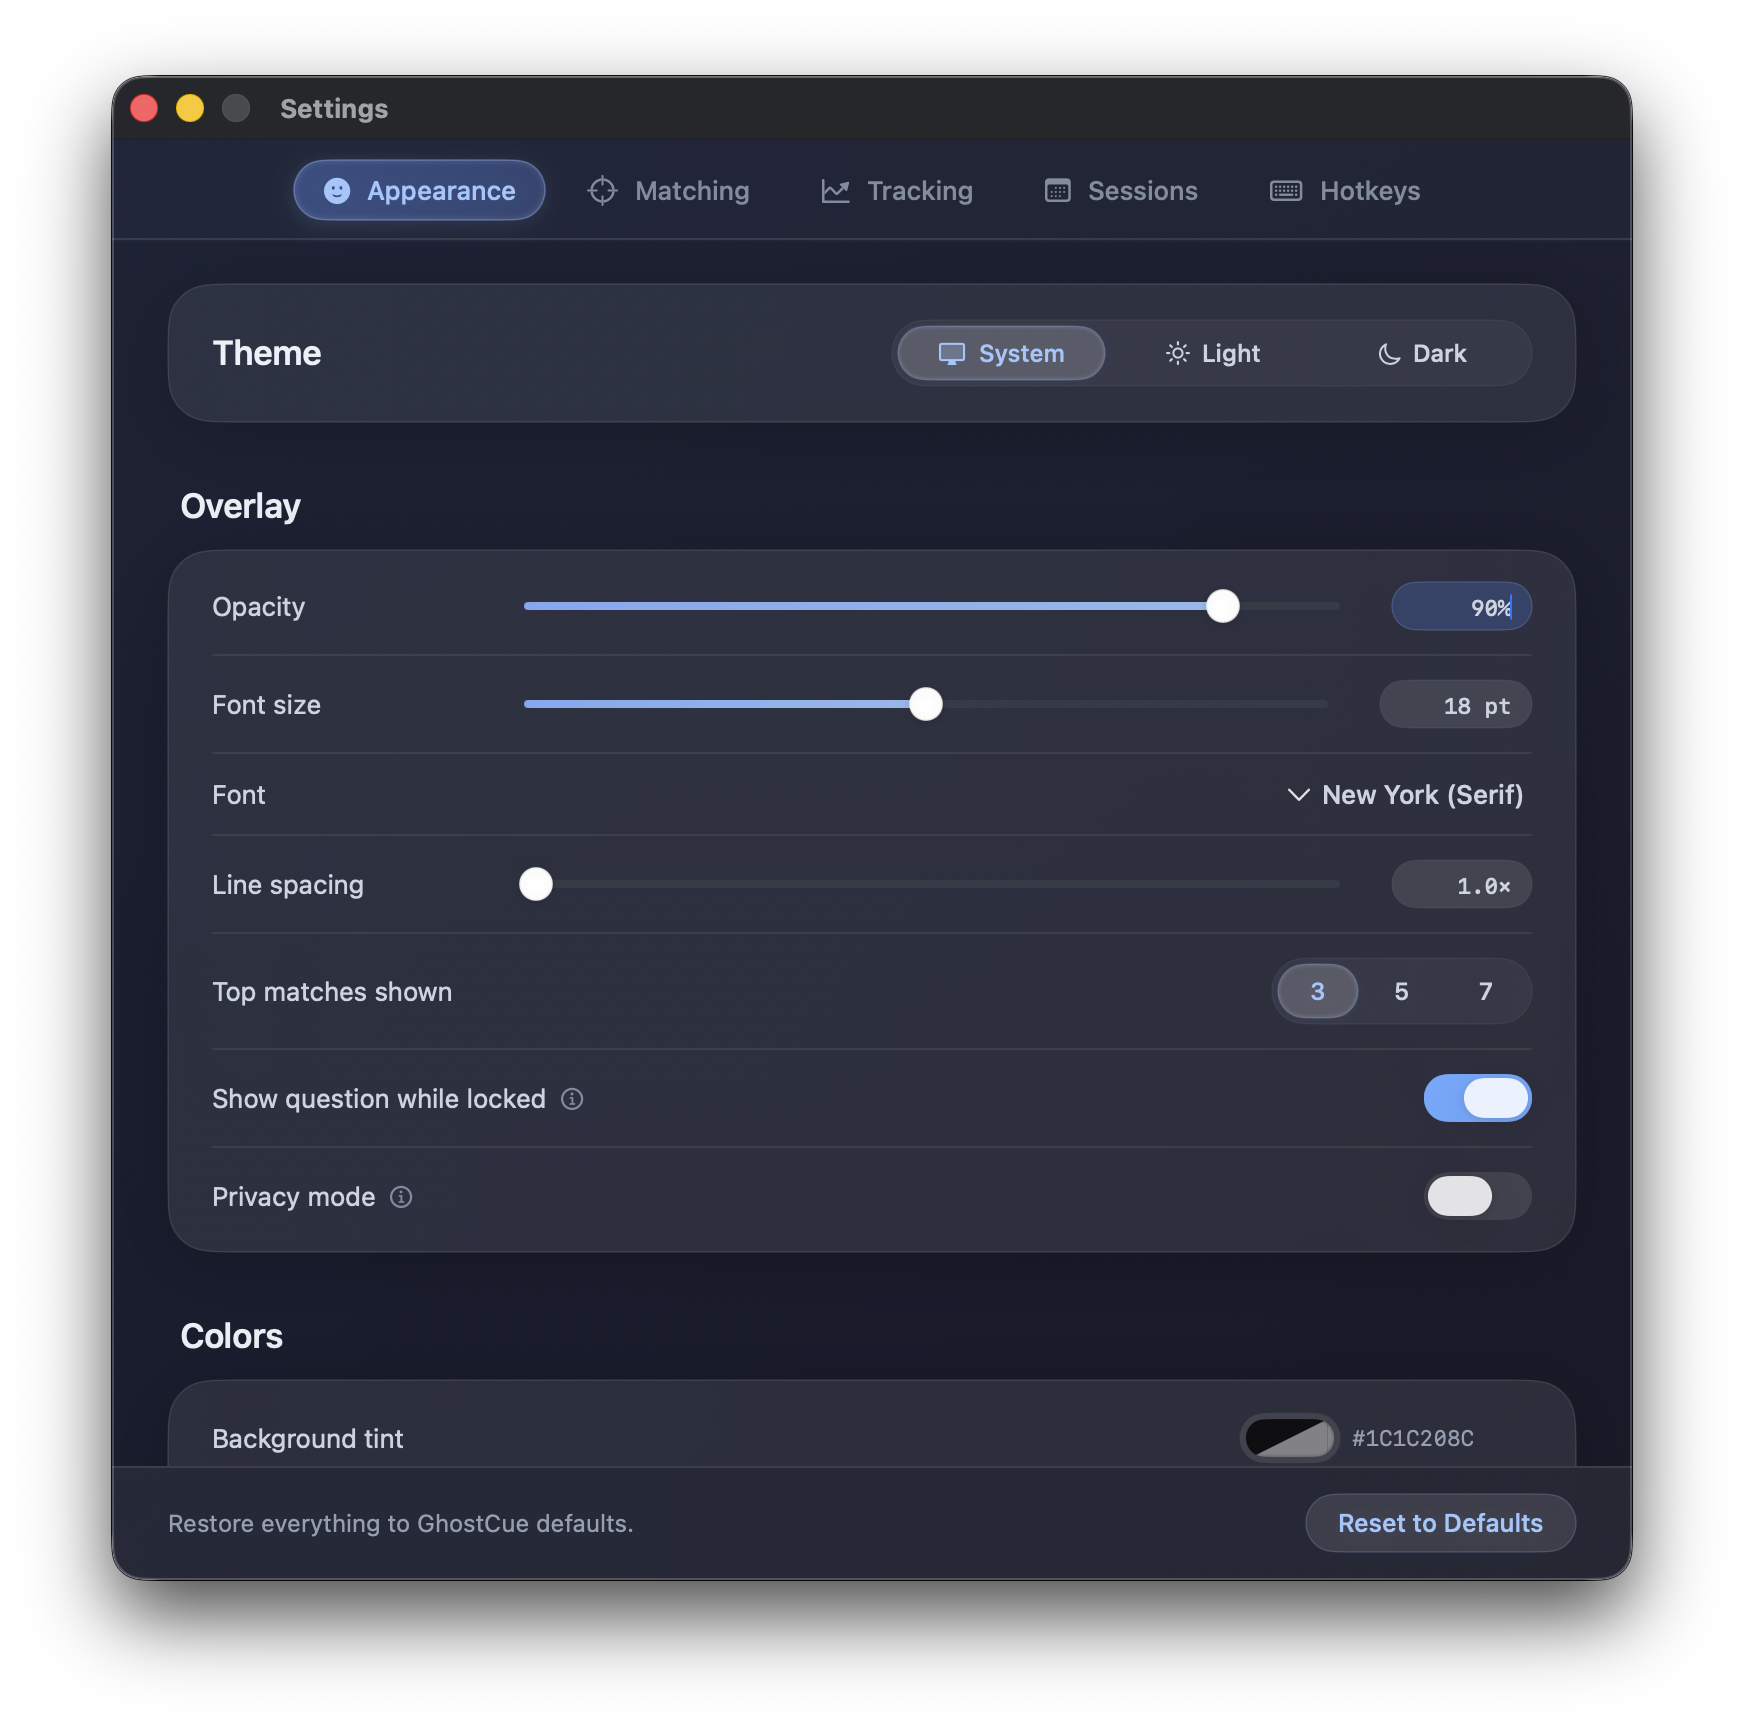
How the overlay looks. Light / Dark / System theme. Opacity, font, font size, and line spacing for the overlay text. How many matches to list (3, 5, or 7). Whether to keep the question visible once you've locked onto an answer (off gives the answer more room; on keeps the question pinned at the top, dimmed). Privacy mode, which hides the overlay from screen recordings and video calls. And three color pickers — background tint, text, and highlight — if you want to colour-code the overlay to match your desktop.
Matching
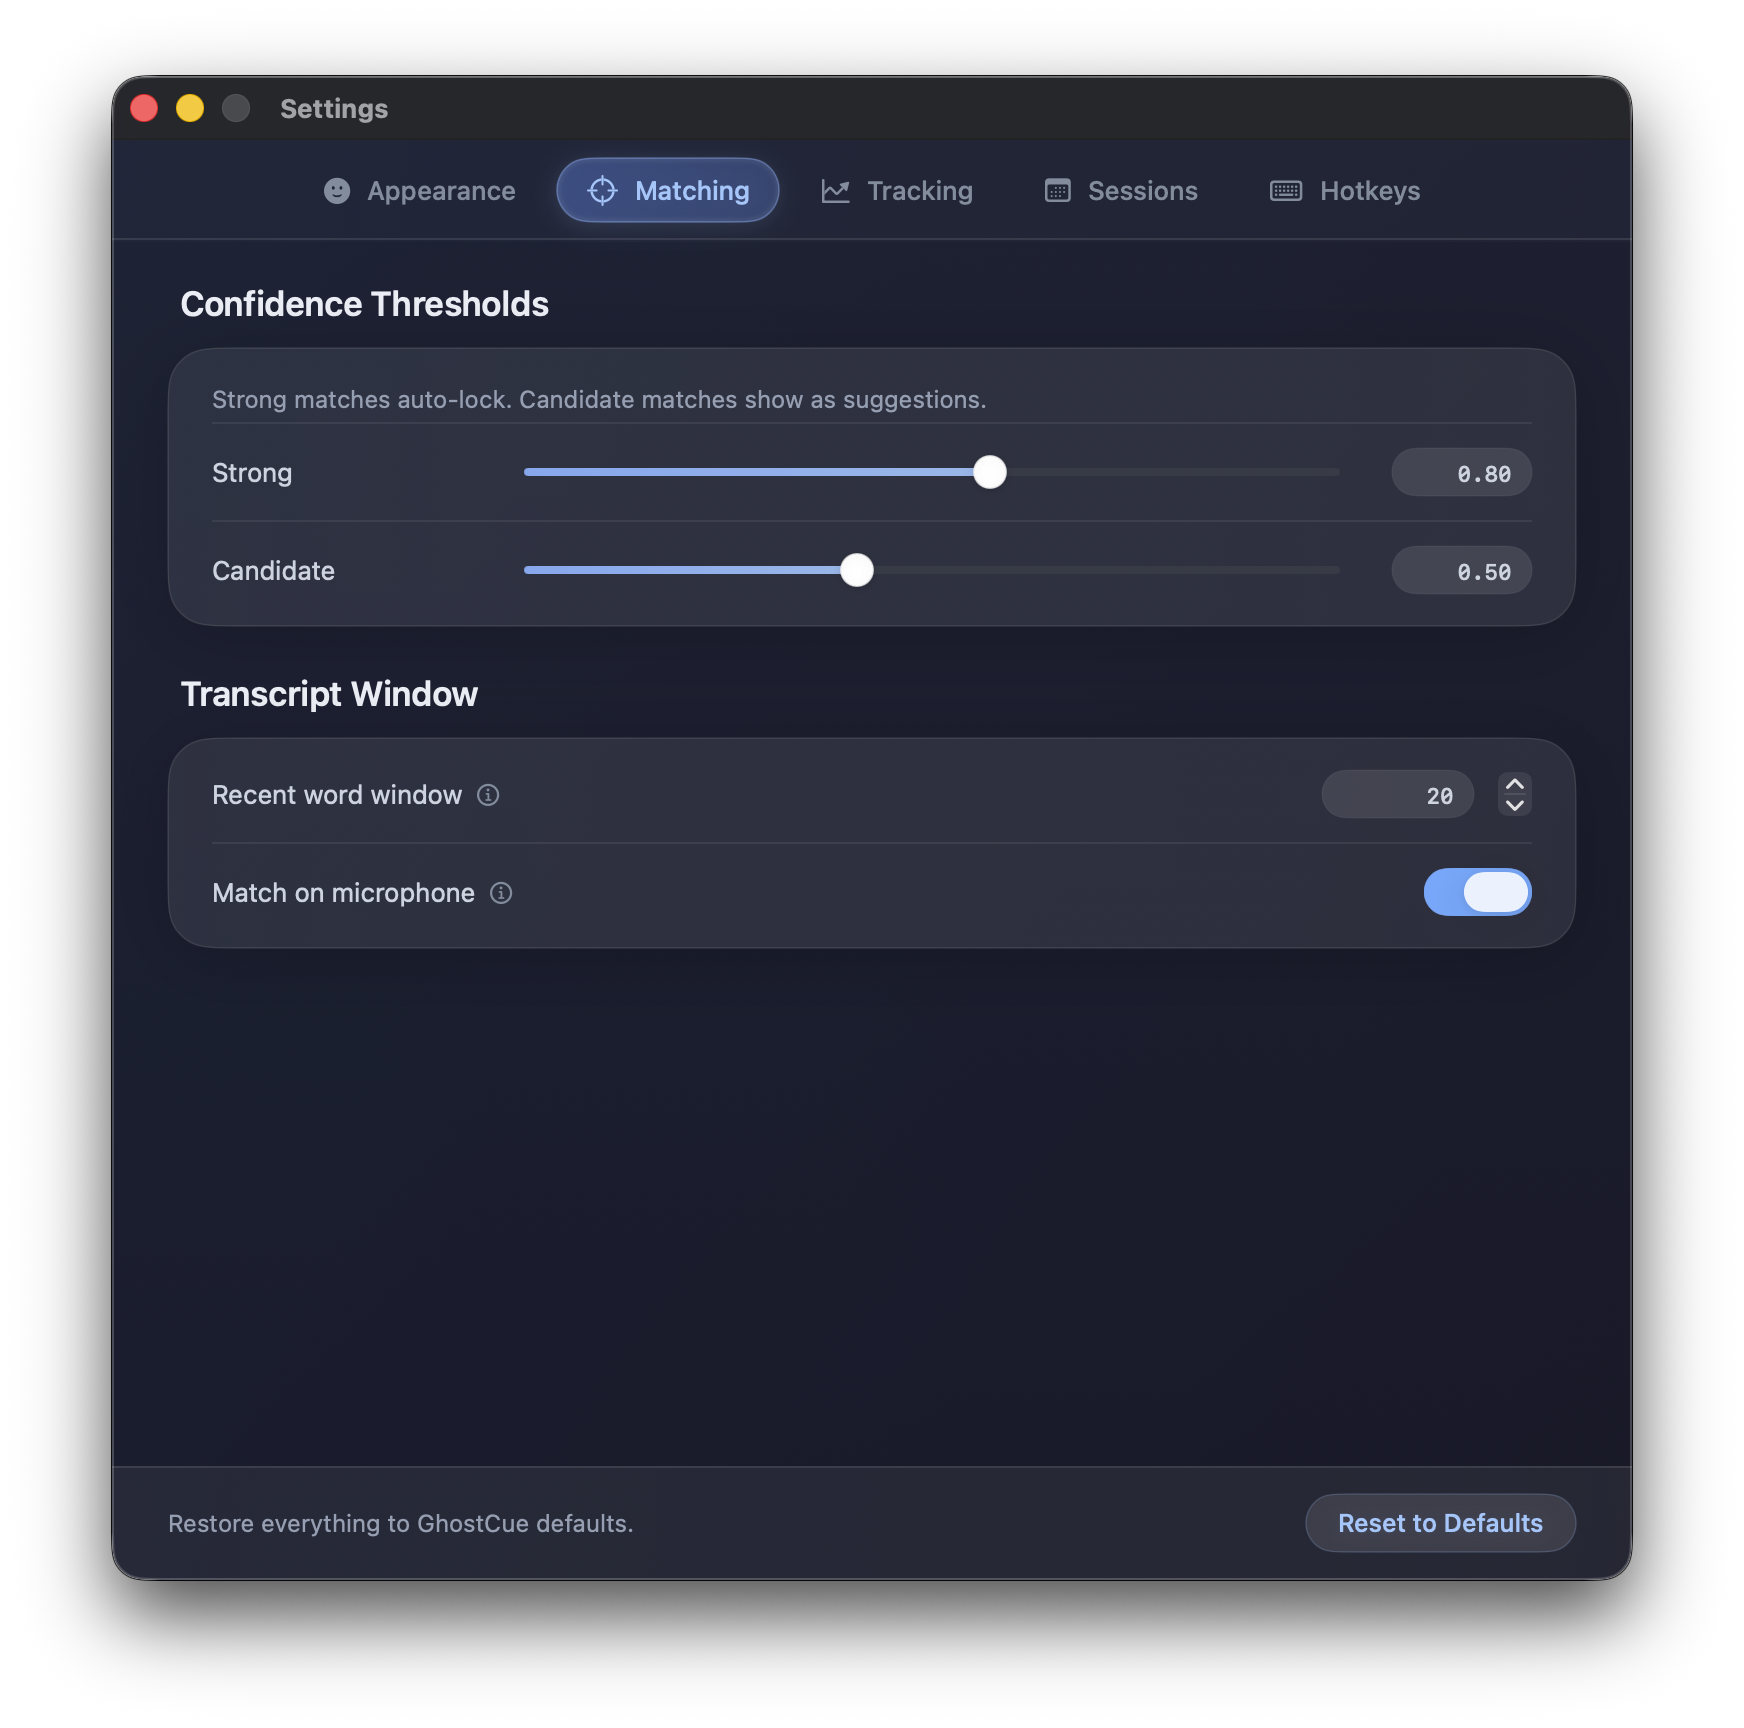
How aggressively GhostCue jumps to a match. Two confidence thresholds: Strong (above this score, GhostCue commits immediately) and Candidate (above this, it's a possible match worth showing). The recent word window controls how much of the live transcript is used to score against your questions — larger windows capture full questions but include more noise; smaller windows react faster but might miss longer phrasings. Tune these if you find GhostCue is jumping too eagerly or not jumping at all.
Tracking
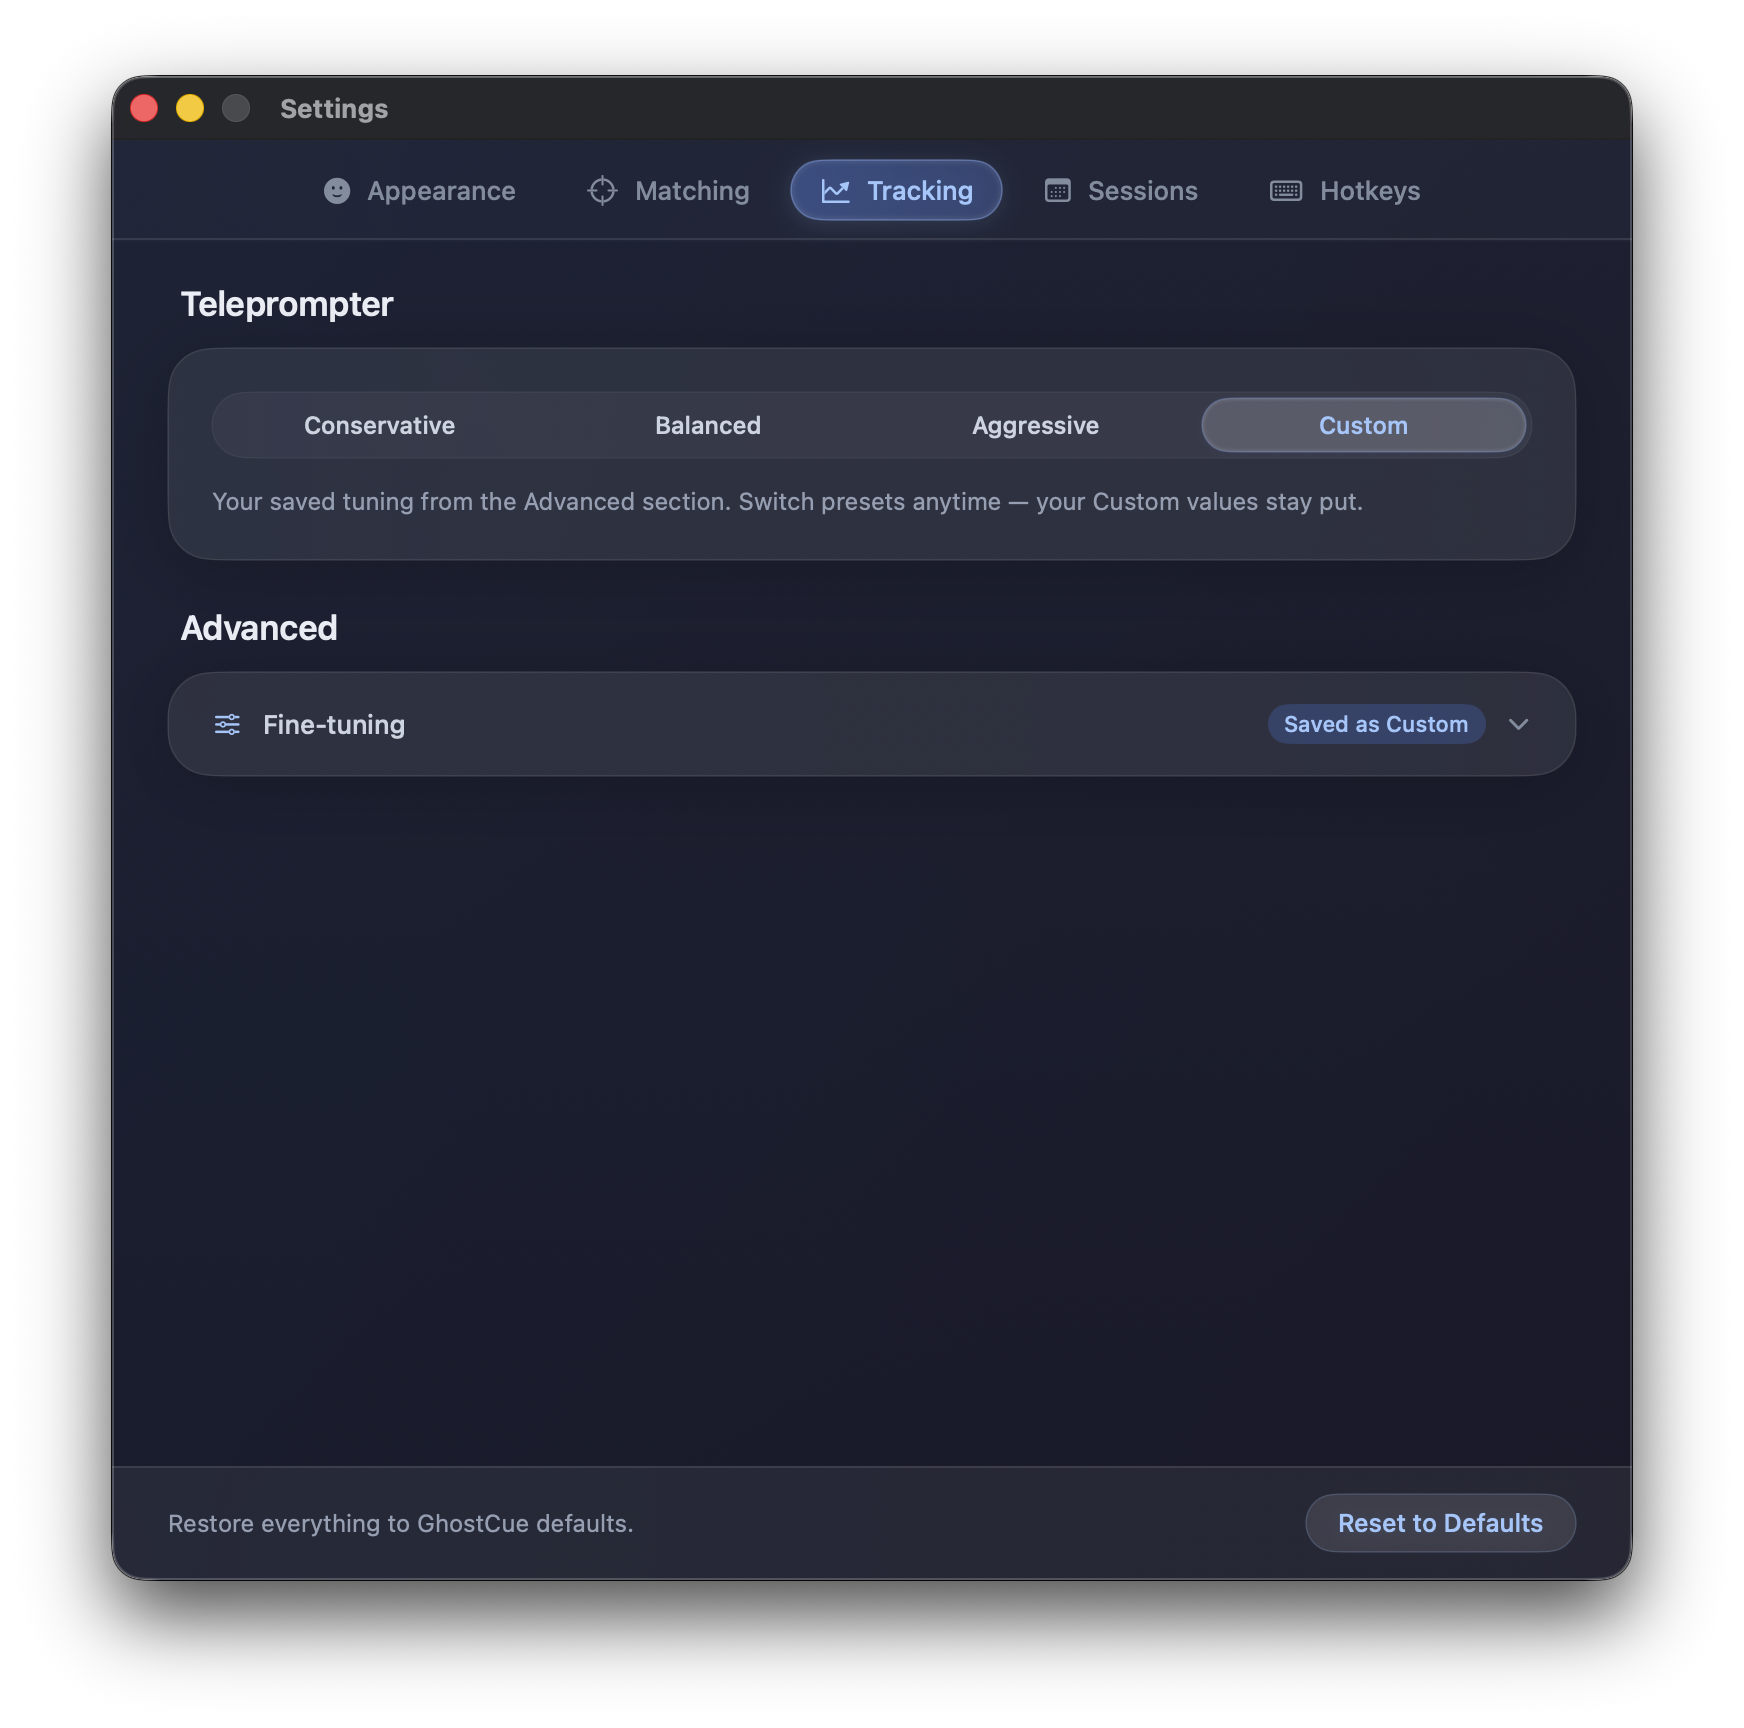
How the teleprompter follows your voice once you're locked on. Three presets: Conservative (won't move on until very sure), Balanced (the default), and Aggressive (advances eagerly). For most people the presets are enough; if you want finer control, expand Fine-tuning for the underlying parameters (sliding-window size, scoring penalties, debounce timing, auto-lock and auto-unlock delays). Each control has a hint icon explaining what it does.
Sessions
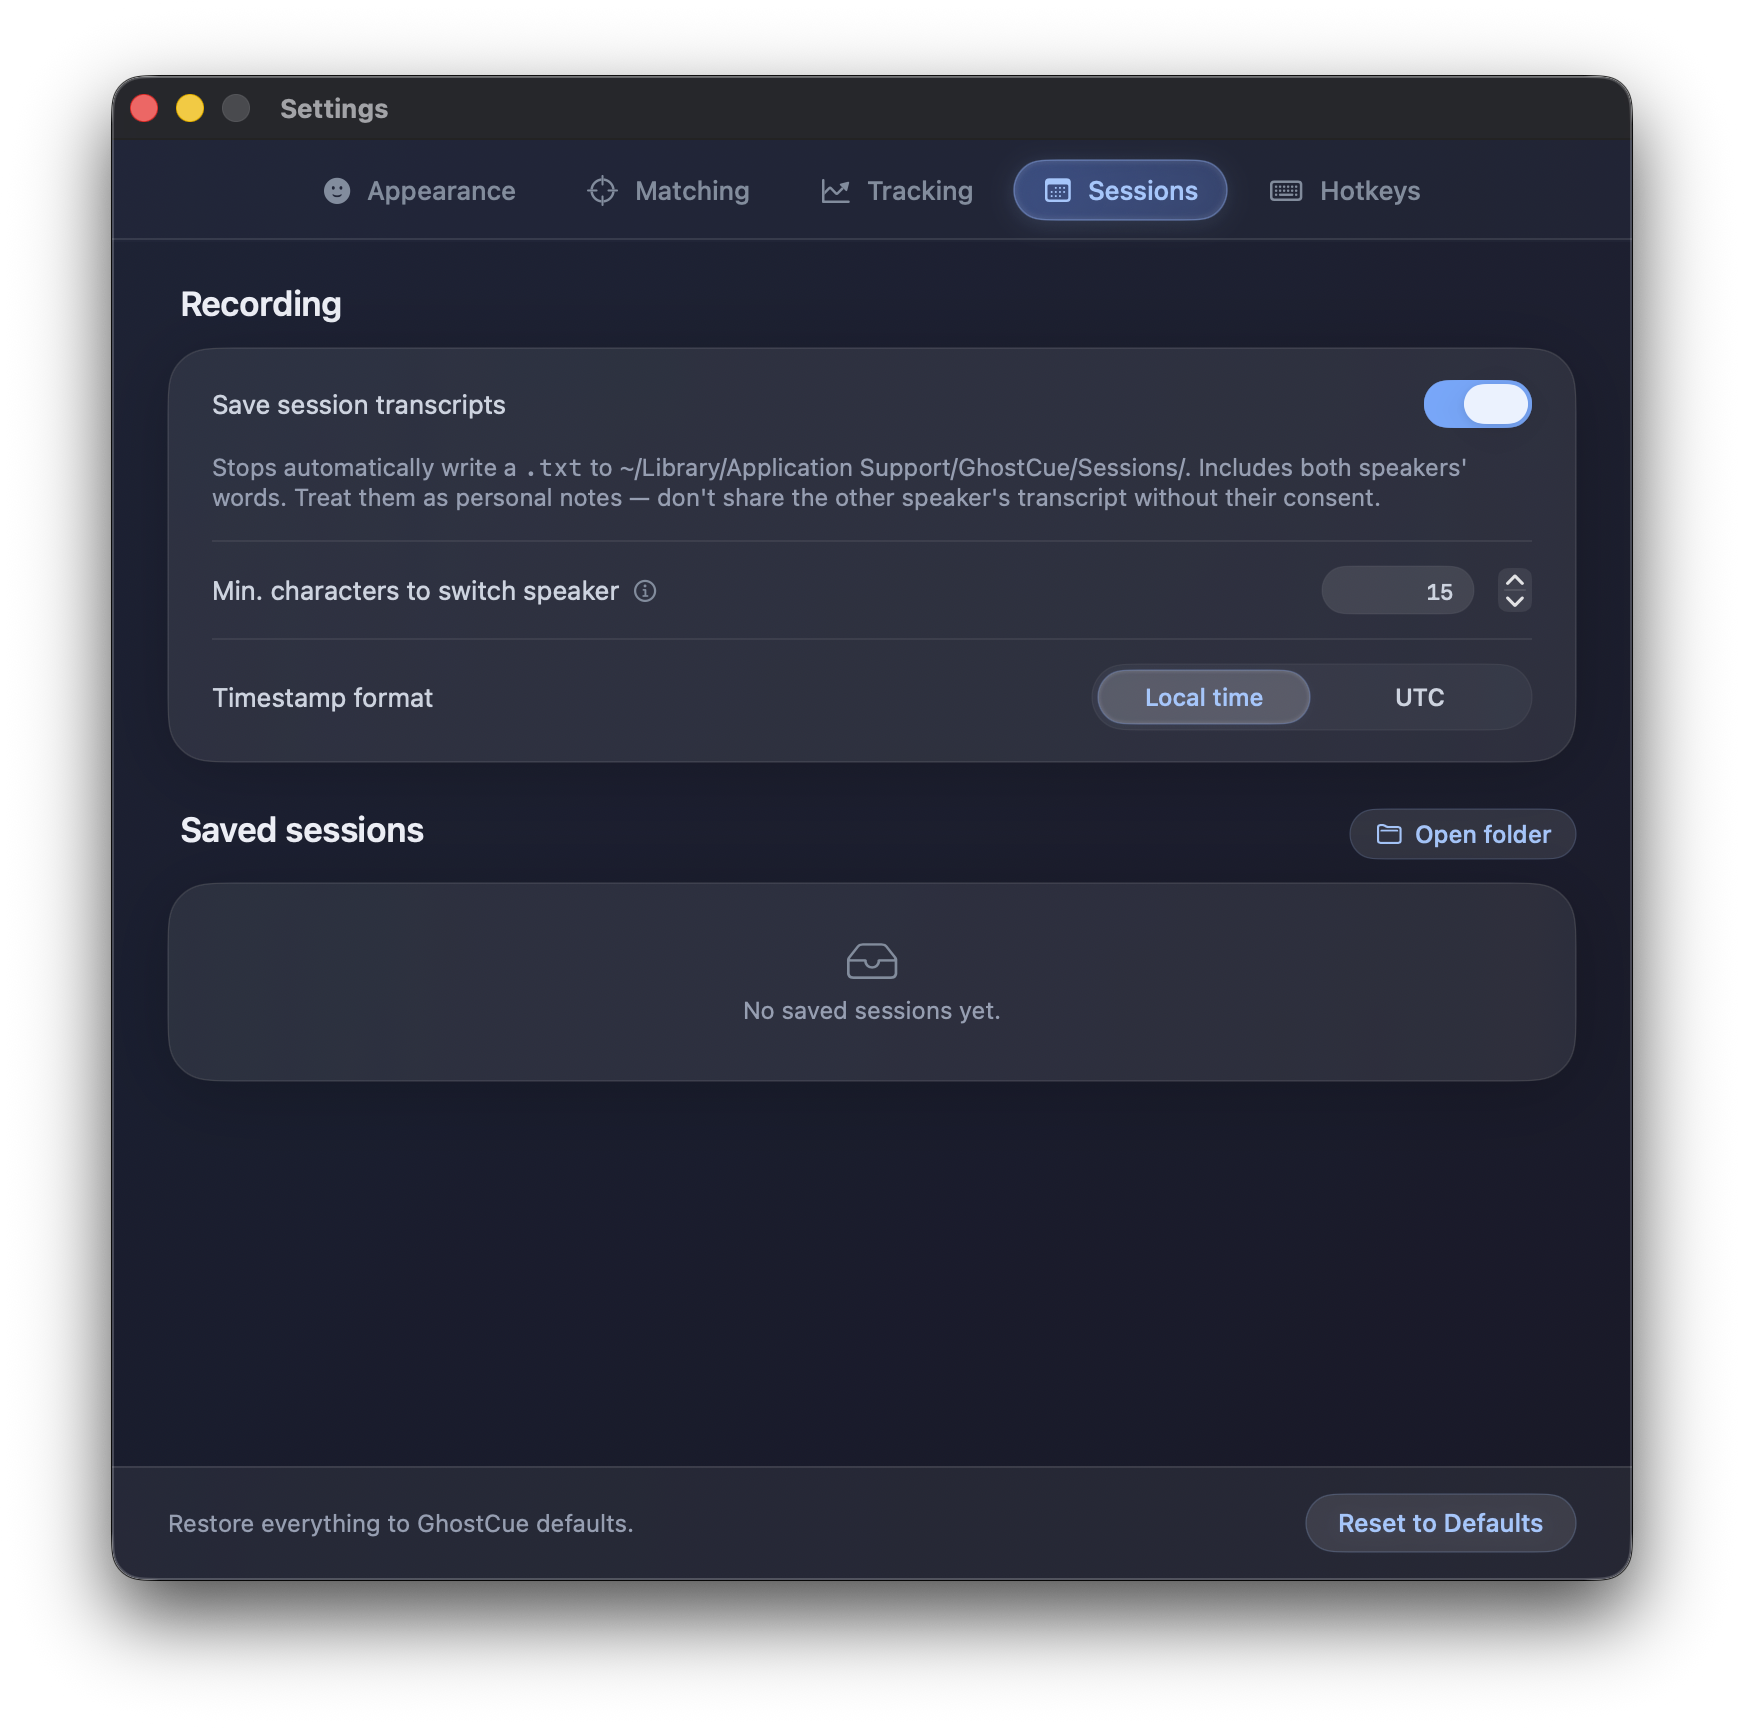
Whether to save a transcript every time you stop a session. Where the files live (a button jumps you to the folder in Finder), and whether timestamps in the filename use Local time or UTC. The list at the bottom shows your saved sessions; click any row to open the transcript, or use Clear all sessions to wipe them.
Hotkeys
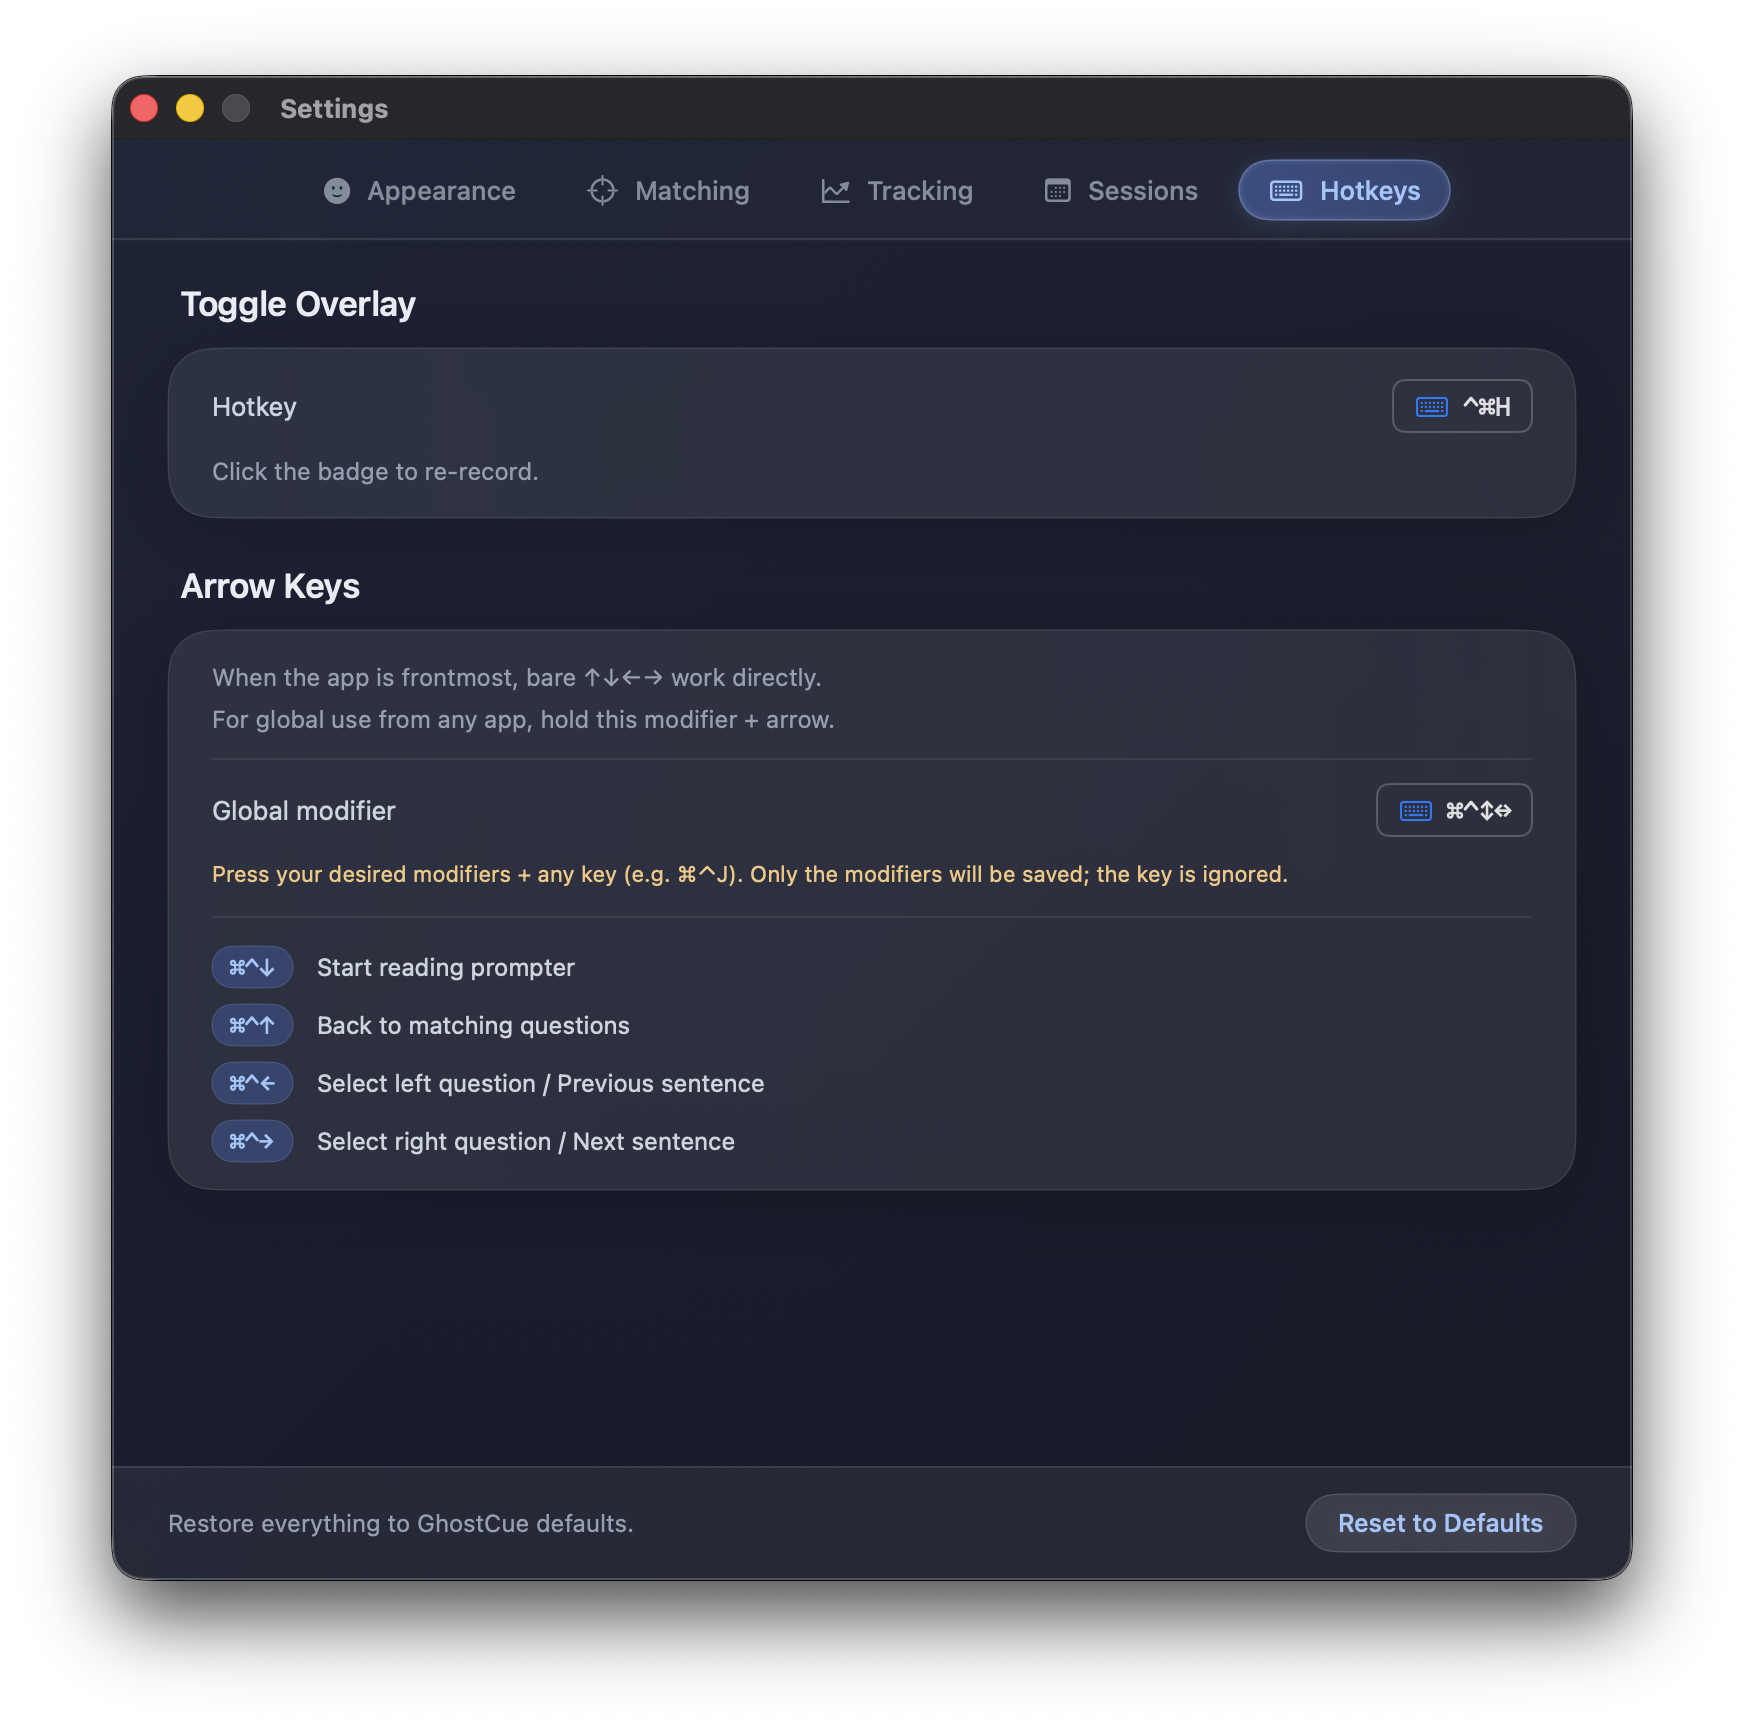
Rebind every shortcut. Click any hotkey row, then press the new combination you want. Use Restore Defaults at the bottom of the window to get back to the originals.
Saved transcripts
If "Save session transcripts" is on, every session ends by writing a .txt file like:
GhostCue Session — 2026-05-27 18:42 (local)
Speakers: Speaker (system audio), Me (microphone)
Note: don't share the other speaker's transcript without their consent.

[Speaker] …thanks for the walkthrough. Could you recap how the
rollout plan handles the migration step?

[Me] Sure — we stage the migration against a production replica
first, then run it behind a feature flag so we can roll back…
Files live in:
~/Library/Application Support/GhostCue/Sessions/You can open the folder directly from Settings → Sessions → Open folder, or click Reveal on the toast that appears right after a session ends.
These are your notes. Treat them like any other recording: don't share the other speaker's transcript without their permission.
Privacy
- Everything runs on-device. Audio is captured locally, transcribed locally with macOS's on-device speech recognizer, and matched locally. None of it is sent to a server.
- Nothing is recorded until you click Start. GhostCue does not eavesdrop while idle. Microphone and system-audio capture are explicit, user-driven, and clearly indicated by the live level meters.
- Privacy mode keeps the overlay out of screen recordings and video calls when you don't want your notes visible to others.
- Saved transcripts stay on your machine. You decide whether to keep, share, or delete them.
See the full Privacy Policy.
Tips
- Keep your card questions short. GhostCue matches what the other speaker says against the question text you wrote, so a clean, concise question line matches more reliably than a long one.
- Practice first. Run a quick session against yourself reading your own questions out loud. It's the fastest way to get a feel for how aggressive you want the matching and tracking presets to be.
- Move the overlay before you go live. Once a call starts you won't want to be dragging windows around. Park it in the corner closest to your camera so your eyeline stays natural.
- Use Privacy mode on shared screens. If you're presenting, flip it on so your notes don't ride along into the recording.
- One topic per question. If an answer covers two distinct topics, splitting it into two questions usually gives better matching than a single sprawling card.
FAQ
Does GhostCue use AI to write answers?
No. GhostCue never writes or invents anything — there's no chatbot or language model producing answers. Every answer it shows is one you wrote yourself ahead of time; the app only listens for the right moment and surfaces your own note. It does use on-device machine learning to transcribe speech and to match what's said to the right question in your set, but that only ever points to a card you authored.
Does GhostCue work without internet?
Yes. Speech recognition, matching, and the overlay are all local. The only time GhostCue talks to the network is for the optional macOS App Store updater itself.
Will it pick up the other person if I'm not on a call?
Only if their audio is coming through your computer (a video call, a YouTube clip, a podcast in another tab). GhostCue captures system audio — what your speakers/headphones are playing — not the room around you.
Can I use it for languages other than English?
Not yet — GhostCue currently works in English only. Both the live transcription and the matching that finds your prepared answers are built around English, so other languages aren't supported today. Support for more languages is on the roadmap.
The overlay is showing up in my Zoom recording. How do I hide it?
Turn on Privacy mode in Settings → Appearance. The overlay will stay visible to you on screen but disappear from any screen recording or shared screen.
Can I have more than one set of questions (e.g., one per client)?
The current version uses a single set at a time. Use Export to back up a set, then Import the next one when you switch contexts.
My notes aren't matching well — what should I tweak?
Start by lowering the Strong threshold in Settings → Matching (so GhostCue commits more readily), or increasing the recent word window if your questions are long. If matches are jumping around too much, switch the tracking preset to Conservative.